Design
In this part, I elaborate on both the UI and technical design of the application.
UI Design
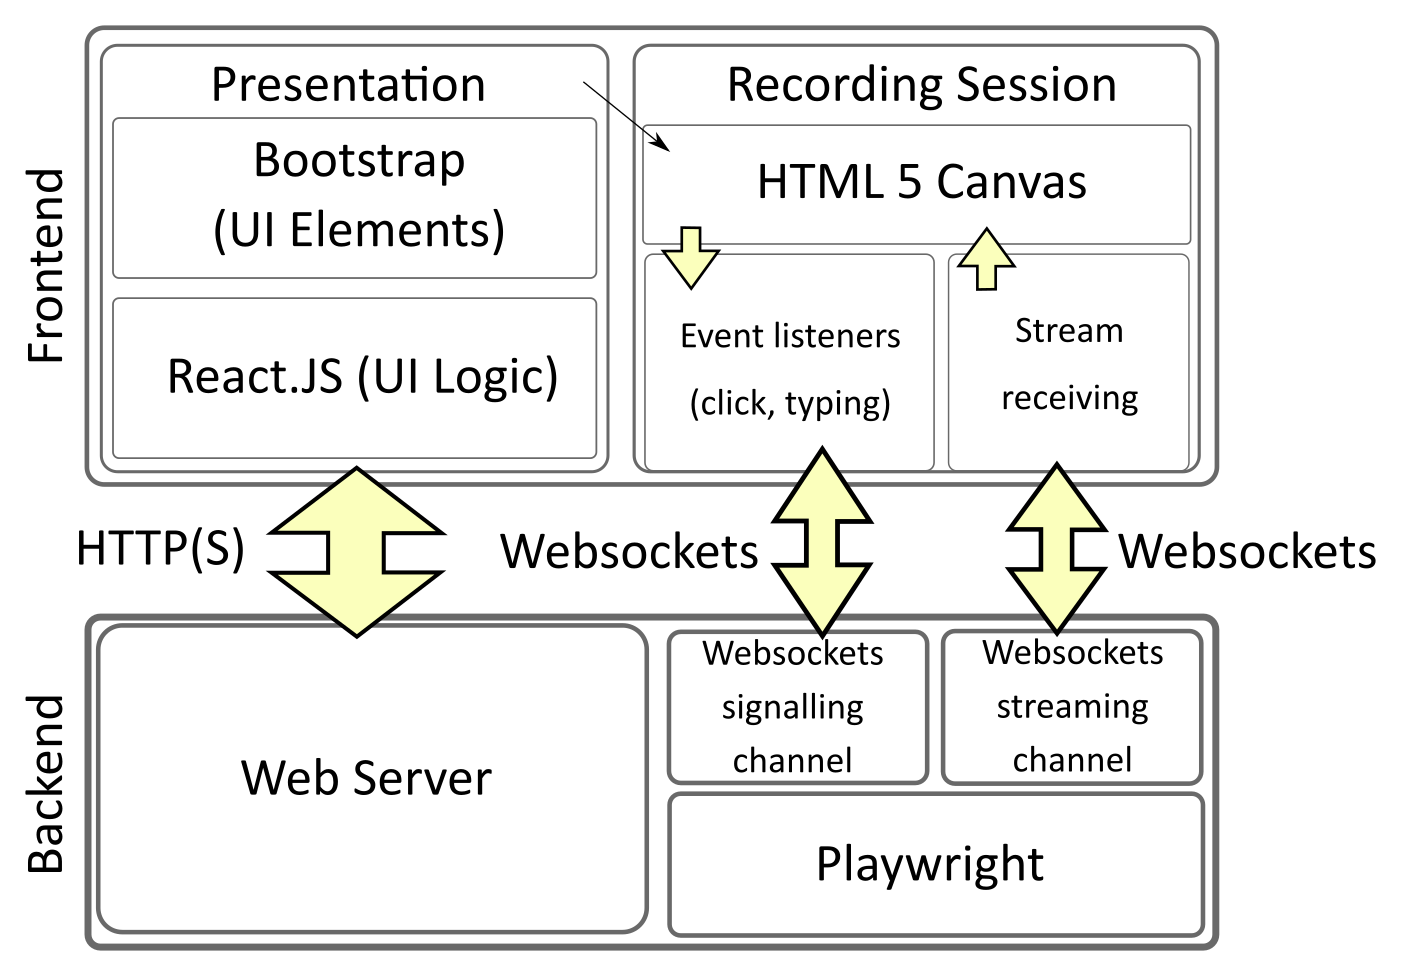
- The front-end application should be written using React.js for the UI logic and Bootstrap for UI elements and layout management.
- Other UI frameworks, such as Angular or Vue.js also went into consideration here. React.js is preferred for its combination of a relatively small memory footprint, fast execution times and detailed documentation.
- As for the component design libraries, several others were considered, namely Material UI and Ant Design. Bootstrap got selected mainly because of its recognizable and simple design and widespread browser support.
Main Menu
 |
|---|
| Main Menu Mockup (courtesy of Apify) |
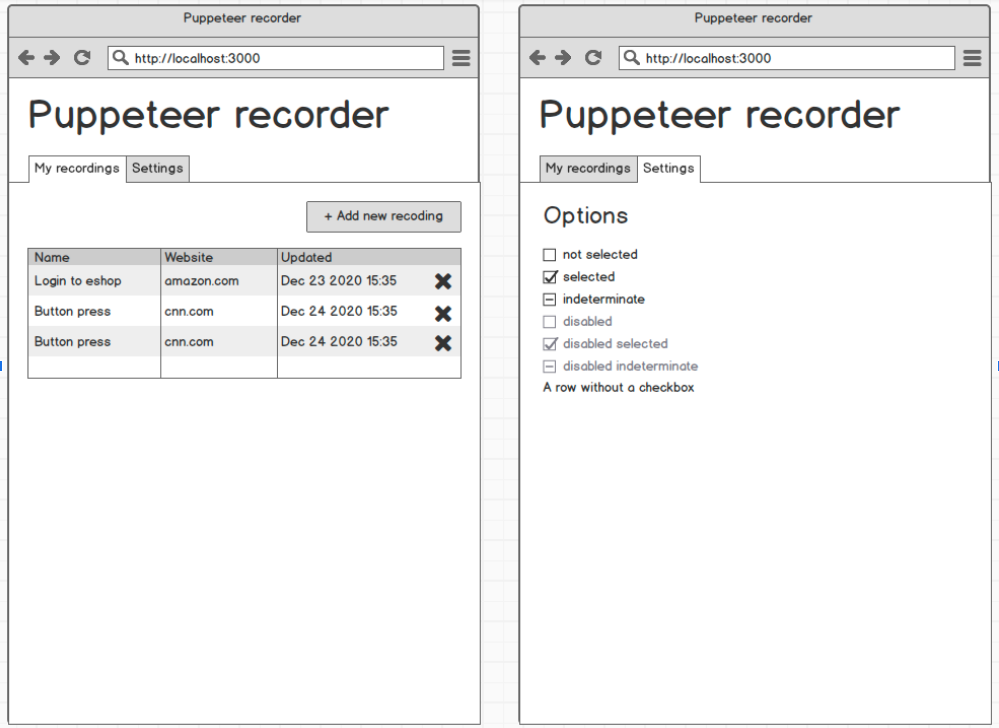
After startup, the user is in the Main Menu, where they can see a list of their existing recordings.
- ✔️ By clicking on any of the recordings, the user is taken to the Snippet Detail Screen. By clicking the New Recording button, the user is taken to the Snippet Detail Screen as well - a blank one.
- ✔️ By clicking on the X button and confirming this decision, user deletes the respective recording from the server.
- ✔️ By clicking on the rename button, user can rename the recording.
Snippet Detail Screen
 |
|---|
| Snippet Detail Screen Mockup (courtesy of Apify, modified) |
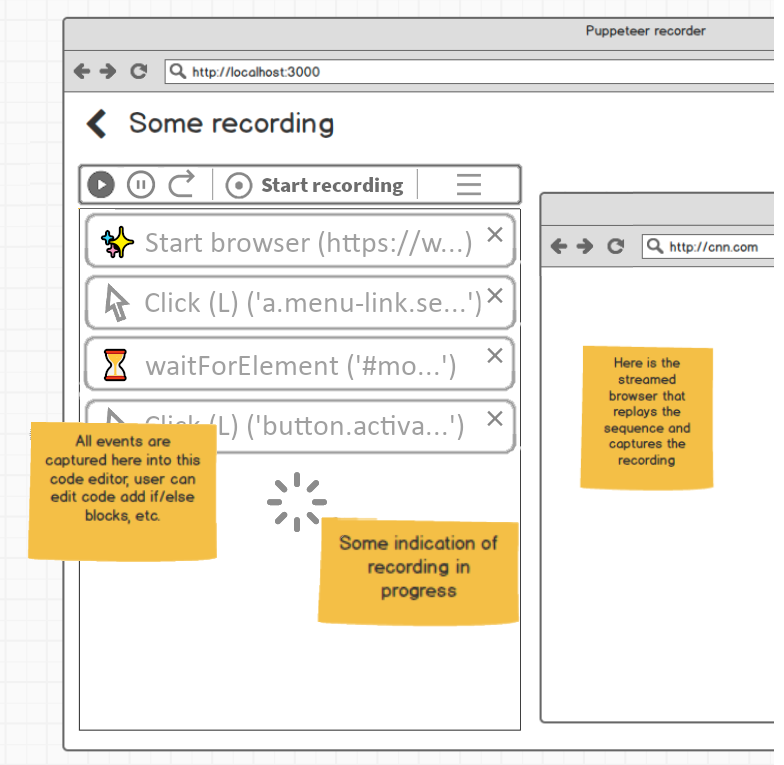
The Snippet Detail Screen is the main window of the entire application, as the recordings are being made and edited here.
- ✔️ This screen is vertically divided into two parts: Code and Playwright Environment. Even though there are no real technical limitations regarding the client screen size / orientation, using Pwww on portrait oriented devices (e.g. smartphones) is not expected due to nature of the application.
- The Code part is where the generated code appears, in the uppermost part of the Code section, there is also a Control Bar with Play, Pause, Step, Start Recording and Settings buttons.
- 🟡 Clicking the Settings button opens a context menu with Delay setting. By editing this value, the user sets the delay before running each "code block command".
- Not implemented, although very simple to implement if necessary (add another Promise (with timeout) to the playback reducer in
recordingScreen.tsx).
- Not implemented, although very simple to implement if necessary (add another Promise (with timeout) to the playback reducer in
- ✔️ Double-clicking any of the code blocks opens a modal window with Playwright code editor, where the user can customize this specific section of the generated code.
- ✔️ At the bottom of the Code section, there is a New Block button, which is disabled during active recording session. Clicking this button also opens a modal pop-up window with empty textarea field, where the user can enter their own custom code.
- 🟡 Clicking the Settings button opens a context menu with Delay setting. By editing this value, the user sets the delay before running each "code block command".
- ✔️ In the Playwright Environment section, there is an HTML5 canvas element, receiving the Playwright video stream. This way, user can see what is happening in the remote browser on the server. By interacting with this canvas (clicking, typing), user remotely interacts with the remote Playwright instance, invoking respective browser actions.
- ✔️ By clicking the "Export" button in the upper right corner of the screen, user can download the current Playwright script to their device, which is trivial as the script is already saved as a file on the server. This script should be executable by user's local instance of Playwright, or anywhere else, think web scraping automation services etc.
- Note 18/08/2021 - not so trivial, as the recording is saved as a JSON file and transpilled into runnable .js when requested.
Technical Design
 |
|---|
| Application Architecture Diagram (simplified) |
Backend
- The backend server part of the application has no GUI (runs in CLI mode only). It should be implemented in Node.js, which is particularly useful in this case for its native integration of Playwright.
- Server should offer connection over both HTTP(S) (to serve the webpage with UI) and WebSockets and WebRTC (to communicate with the client and stream the Playwright environment during the recording session). Any other approach for the server -> client communication (other than streaming the window capture) is seen as not feasible for both security and practical reasons.
- For the realtime video streaming, some HTTP-based protocols, namely DASH and HLS, also went into consideration. WebRTC is still seen as a more suitable option as both HTTP-based protocols are still (as of April 2021) prone to latency problems. Please note that WebRTC needs a special signalling channel to establish communication. The standard way of doing this is using Websockets.
- Note 18/08/2021 - Websockets used for "streaming" instead of WebRTC due to Playwright's technical limitations.
- The client -> server communication could be also implemented using HTTP, for example using REST-like API. In this case, WebSockets seem as a better option, mostly for the smaller overhead and possibility of bidirectional communication, allowing for possible error signalling etc.
- For the realtime video streaming, some HTTP-based protocols, namely DASH and HLS, also went into consideration. WebRTC is still seen as a more suitable option as both HTTP-based protocols are still (as of April 2021) prone to latency problems. Please note that WebRTC needs a special signalling channel to establish communication. The standard way of doing this is using Websockets.
- Server should also provide persistent storage for user-made code snippets, such as recordings and custom edited code. Here, using simple files and a Node.js filesystem API is preferable, since the main purpose of the application is to run these files and letting users to download the code files. For this reason, storing code in any kind of database-like structure would add an unnecessary layer of complexity. Uploading code from local storage into Pwww is not allowed as it would pose as a security threat, and thorough code analysis is out of scope of this work.
Typical User Flow
- ✔️ By navigating to the application website, user establishes the HTTP connection to the server, opening the Main Menu Screen.
- From now on, all navigation and other user actions are handled by React.JS.
- ✔️ By selecting an existing recording or clicking the New Recording button, user goes to the Snippet Detail Screen.
- ✔️ When the Start Recording button is clicked, WebSockets connection to the server is established, and a signal to start a Playwright session is sent.
- After the WebSockets connection is set up, the server launches a local Playwright session and sets up the WebSocket video stream to client.
- ✔️ After establishing the WebSocket stream, the user can interact with the streamed canvas. Events from the canvas get sent to the Playwright instance on server using WebSockets again, inflicting corresponding actions there. In case these actions induce recordable events (browsing etc.), they get recorded by Playwright and a notification about this is sent back through WebSockets to client so a corresponding code block can be shown.
- ✔️ Similar approach, i.e. sending signals using WebSockets, should also be taken with other stream-related user actions, such as stopping the recording session or replaying the recorded code snippet. On the other hand, code snippet management (renaming, deleting the snippets from the Main Menu Screen) should be implemented using asynchronous calls to a REST-like API over HTTP, as there are no critical latency requirements and the whole process gets reasonably simpler.